Hey there! If you're into laser engraving, you already know the magic of turning a blank piece of wood, metal, or acrylic into a stunning piece of art. But there's a catch: your laser machine doesn't understand standard photos. To make the magic happen, you need to translate that image into a specific language called G-Code.
That's exactly where the Porexo Laser Studio comes in. Our free online image to G-Code converter acts as the perfect bridge between your digital photos and your laser engraver. Whether you are running a diode laser in your garage or a commercial fiber laser, let's explore how you can prep your images flawlessly—without spending a dime on expensive software subscriptions.
Handy Tools For You
How to Convert Any Photo to Laser G-Code for Free
Preparing a photo for laser engraving is all about contrast, dithering, and machine instructions. Here is a simple, step-by-step guide to using our built-in engine:
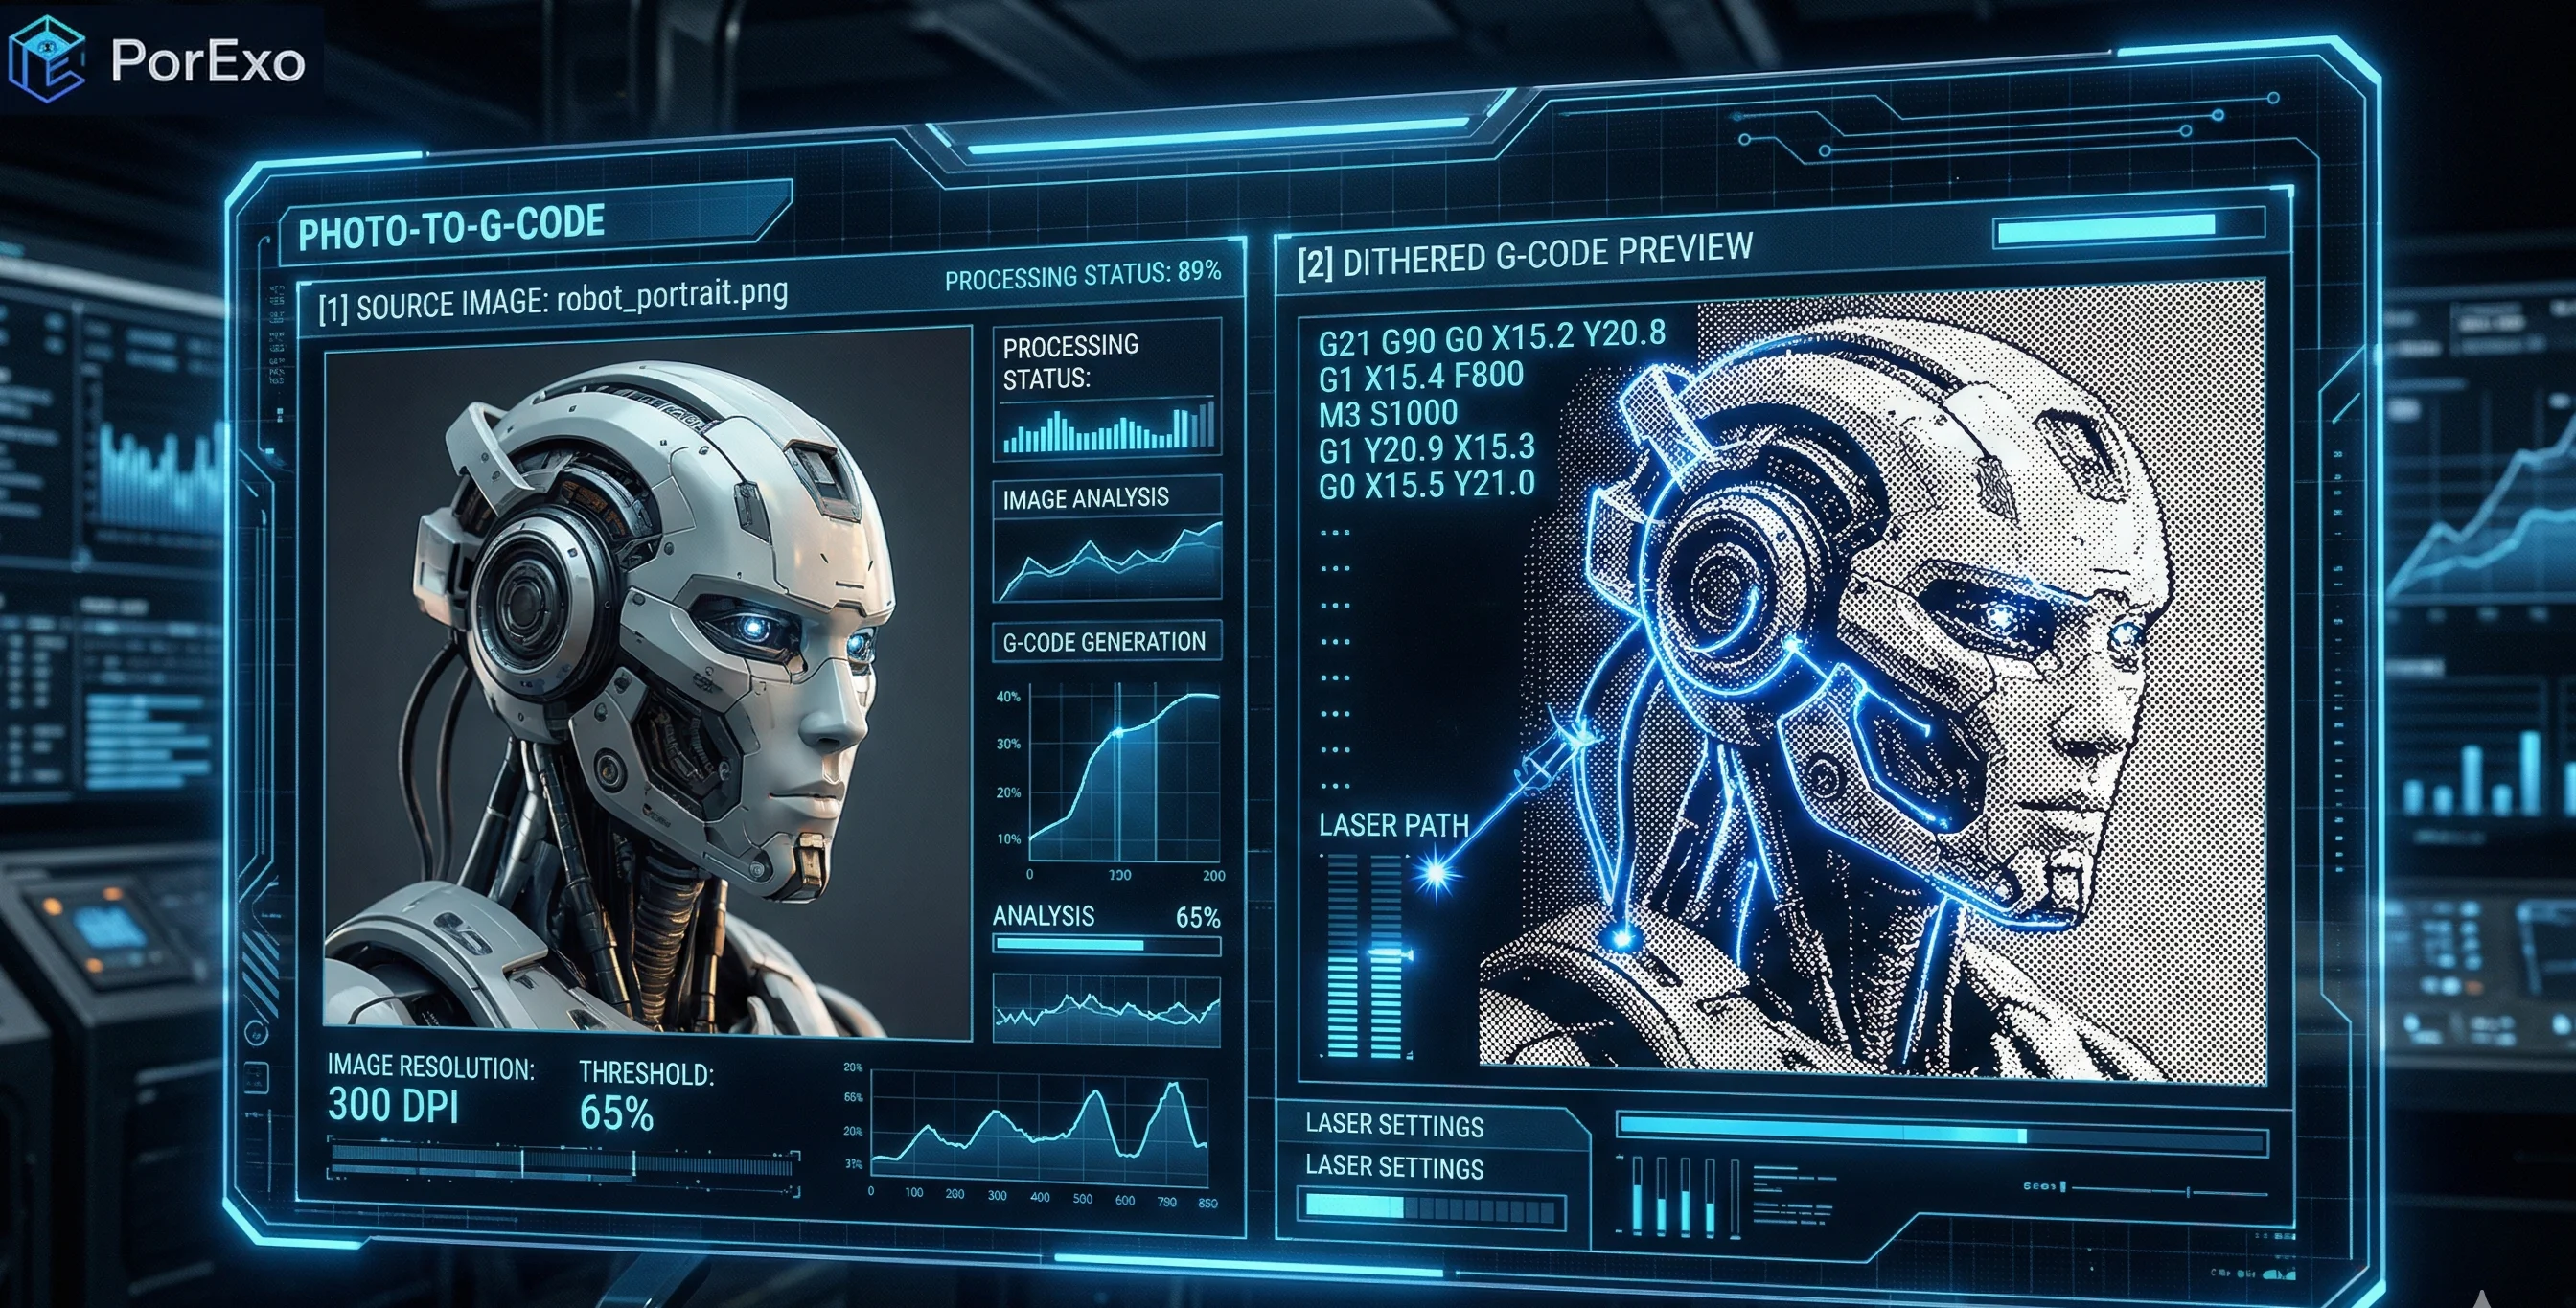
- Upload Your Image: Drag and drop your image directly into the tool. We support standard web formats like JPG, PNG, and WebP. Because our tool runs entirely in your browser, your files are processed instantly and never uploaded to an external server.
- Select Your Machine & Material: Tell the tool what you are working with. Are you using a CO2 gantry, a Fiber Galvo, or a Diode laser? Enter your specific bed size and define your laser's spot size (pixel size) for pinpoint accuracy.
- Dial in Speeds and Power: Set your target engraving speed, travel speed, and Max Power (S-value, usually 255 or 1000 depending on your GRBL controller).
- Apply the Dithering Magic: Lasers generally fire in an "on" or "off" state. To create the illusion of grayscale shading, select a dithering algorithm. Use the sliders to adjust brightness, contrast, and threshold until the preview looks perfect.
- Export Your File: Once your machine bed simulation looks good, hit export! You can download the raw
.ncG-code file to send straight to your machine, or grab the processed PNG to use in software like LightBurn or LaserGRBL.
A Simple G-Code Example
Here's a basic look at what the generated G-code for a raster laser job looks like. The thousands of tiny movements tell the laser exactly when to fire and at what intensity.
(Example of Laser-Ready Raster G-Code)
G21 (Set units to mm)
G90 (Absolute positioning)
M4 S0 (Enable laser in dynamic power mode)
G0 X10 Y10 F6000 (Rapid travel to start point)
G1 X10.1 Y10 S255 F3000 (Fire laser at full power)
G1 X10.2 Y10 S128 F3000 (Fire laser at 50% power)
... (Thousands of micro-movements follow)
M5 (Turn off laser)
For a hands-on experience, head over to the Porexo Laser Engraving Tool and drop an image in right now.
Why Use Our Online Laser Studio?
- 100% Private & Secure: All the heavy lifting happens locally inside your web browser using HTML5 Canvas. We don't see your files, and you don't have to wait for slow server uploads.
- Advanced Dithering: Choose from professional dithering modes like Floyd-Steinberg (incredible for detailed portraits), Atkinson, Jarvis, Stucki, or Ordered Bayer to get the absolute best burn on your specific material.
- Serpentine Routing: Checking the "Serpentine" box forces the laser to engrave on both the forward and return passes. This eliminates dead travel time and drastically speeds up your job.
- Live Histogram: Don't guess what your laser will do. Use the live histogram and the "Machine Bed Simulation" to visually verify your design's scale and positioning before you ever fire the beam.
Frequently Asked Questions
📚 Read Next


What is dithering, and why does my laser need it?
Most basic lasers cannot "half-fire" to create a light gray mark; they are either on or off. Dithering is a mathematical process that strategically clusters black dots close together to simulate dark shadows, and spreads them further apart for light highlights. It tricks the human eye into seeing a smooth, continuous photograph on your wood or metal.
Which dithering mode should I choose?
It depends on your material! Floyd-Steinberg is generally the gold standard for high-resolution photos on smooth materials. Jarvis and Atkinson offer slightly higher contrast, making them excellent choices for organic, textured materials like wood grain where fine details might get lost.
Will this G-code work with my Diode laser (Ortur, xTool, Atomstack)?
Yes! Simply select the "Diode" machine type in the settings, ensure your Max Power (S-value) matches your machine's controller (often 1000 or 255), and the exported .nc file will be perfectly formatted for standard GRBL controllers.
Can I just save the processed image instead of G-code?
Absolutely. If you prefer to use a dedicated sender program to manage your CNC laser, you can click the PNG export button. This will download the beautifully dithered, laser-ready image which you can then drop directly into your preferred laser control software. You can even further modify the final output using general tools like our Online Photo Editor if needed!